1. What we are making
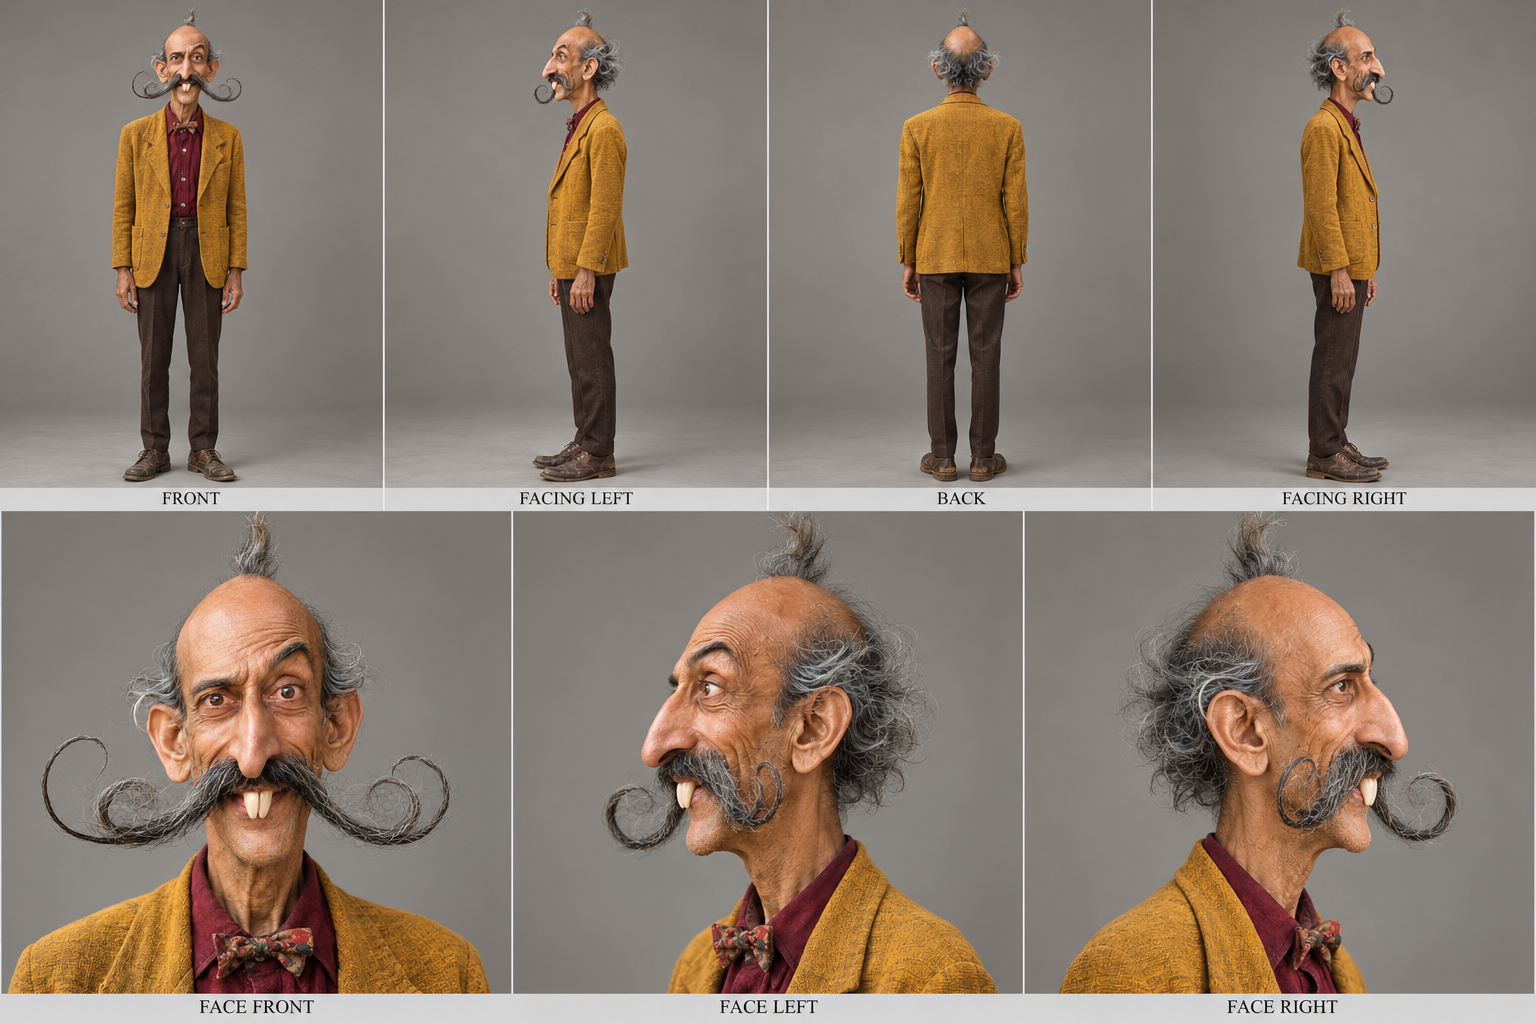
The idea is simple: start with a performance that already works, then ask Genjutsu to replace the person with our fictional Indian character. His curled moustache, prominent front teeth, grey hair tuft and distinctive proportions are the visual identity. The source supplies the action and camera movement; the reference supplies the character.
This is different from asking an image model to invent a fresh person for every shot. We keep the same reference across clips so viewers recognize him. The aim is a consistent character performing the original action, not a different lookalike in each frame.
Use Objects swap when the location and camera already work and you want to change a person, face or outfit. Use Motion transfer when you want the performance in a rebuilt scene. For the workflow below, begin with Objects swap and a face-focused edit. Once that works, try a full-character replacement.
These modes request preservation of the original performance, but the output still needs inspection. Do not assume that a face, hand, jacket or audio track survived unchanged simply because the prompt asked for it.
2. What you need
• A source clip you filmed or have permission to edit. Standard Genjutsu currently accepts 4 to 30 seconds. Start with a short, clear section rather than the busiest part of a long video.
• The original character reference, with a front face and useful side angles. Keep the same master file for the series.
• A Higgsfield account and the payment or credit allowance shown for your selected workflow. Website plan benefits and MCP credit charging can differ.
• An editor such as CapCut to prepare footage, compare results, add captions and export.
• Optional: Claude with Higgsfield connected. It can help inspect the clip, prepare a prompt and organize revisions. It does not remove generation costs or make the underlying model more accurate.
Keep three folders: Source, References and Results. Name outputs by version, resolution and change, such as test-01-face-480p and test-02-head-turn-480p. This makes it much easier to compare what actually improved.
3. Prepare the source video
Keep its shape
For a vertical Reel, keep the source vertical. Do not stretch a 9:16 clip into a 1920-by-1080 landscape frame. Preserve the original aspect ratio and choose a sensible export resolution for that shape. A clean 1080-by-1920 vertical file is a useful editing source, but exporting a blurry clip larger does not restore detail.
Check colour before uploading
Phone HDR footage can look different in an SDR editor or export. If skin, clothing or shadows look wrong, perform a real HDR-to-SDR conversion in the editor. Merely changing a metadata label is not the same as tone mapping. Watch the exported file before uploading it, not only the editor preview.
Make a clean working copy
Trim unnecessary seconds, keep audio, and export a widely compatible MP4 such as H.264 with AAC audio. Avoid repeated compression and keep the untouched original. Use a consistent frame rate in the editing project. This guide does not assume Genjutsu always returns a particular frame rate: inspect the actual output before matching it to the source.
Choose a clip where the face is visible for most of the action. Fast whip pans, hands covering the mouth and extreme motion blur leave less information for a consistent replacement. They can be attempted later, after a straightforward test establishes the character.
4. Prepare the character references
Our master sheet contains front, side and back views plus face close-ups. It is useful for planning the whole character. For a face-focused edit, begin with a clean front close-up and add the matching side view if the source turns. Keep references sharp and large enough to show the moustache and teeth.
Do not mix our original character with a newly generated approximation. Slight differences in hair, nose, teeth or moustache curl can become visible identity changes during motion. More images are not automatically better; every reference should agree about who the character is.
If the output should retain the source outfit, say so explicitly. If it should wear the mustard jacket, burgundy shirt and bow tie from the reference, request those clothes as part of a full-character edit. A face reference that includes clothing can still influence the outfit, so inspect the jacket even on a face-only attempt.
Use reference images you have rights to use. Do not remove identifying marks to evade a service refusal. If an image is unsuitable, replace it with a genuinely suitable reference or use the service's support process.
5. Map the action before writing
Find the beats
Scrub the source and write down the moments that matter: the first clear face, a head turn, a hand passing over the mouth, a step forward and the final expression. Use the editor's timecode rather than guessing from memory. Save several stills at these moments for your own comparison.
Here is an illustrative ten-second clip, not a record of an existing finished video:
| Time | Source action | What to inspect in the edit |
|---|---|---|
| 0-3 seconds | Man faces the camera | Front-face proportions and teeth |
| 3-5 seconds | He turns to one side | Nose, ear, moustache and side profile |
| 5-8 seconds | He walks closer | Face remains the same as it gets larger |
| 8-10 seconds | He gestures near his face | Fingers, mouth and partial occlusion |
Match ranges to physical events
A whole-clip identity request should span the whole clip. Do not describe a different face separately in every segment. Add shorter ranges only to explain difficult moments, such as a turn or an occluding hand.
Pair each time range with an action: “as he turns toward camera” is more useful than a number alone. The model may treat timing approximately, so these anchors are instructions to test, not frame-accurate keyframes.
If you introduce a prop or change a setting, place the transition on a movement or camera cut where possible. Describe its physical location and behavior. “The object remains on the table as he walks away” is clearer than “the object disappears.” Keep such extra changes out of the first character test.
6. Write a focused prompt
Choose standard Genjutsu, select Objects swap, upload the clip and add the character images. Label your references in your notes: front face, left face and full outfit. If the interface supports image mentions, use the exact identifiers it provides rather than assuming a particular numbering scheme.
Face-focused starting prompt
TASK: Edit the supplied video using the attached fictional character references.
0-10 seconds: Replace only the main adult man's face and hair with the character in the front-face reference. Match the curled moustache, two prominent front teeth, grey hair tuft and facial proportions. Keep his original clothing, body position and gestures.
3-5 seconds: As he turns sideways, use the matching side reference to maintain the same nose, ear, moustache and head shape. Keep the character consistent through the turn.
5-8 seconds: As he walks closer, keep the same face and proportions. Do not introduce a different-looking character in the close-up.
8-10 seconds: As his hand passes near his face, preserve the hand's natural motion and depth. The face should reappear consistently after the hand moves away.
Keep the source background and camera framing. Do not add another person or change the outfit.
Replace every time range and action with what actually happens in your footage. Identify the target by clothing, screen position and action if more than one person appears.
Useful variations
Full character: Replace the opening instruction with “Replace the main adult man with the fictional character in the references, including his mustard jacket, burgundy shirt, bow tie and dark trousers. Match his position and performance in the source.” Remove any conflicting instruction to keep the original outfit.
Different location: Use Motion transfer, describe the new setting and keep the same character references. Treat this as a separate creative test rather than changing mode, outfit and location midway through diagnosing a face problem.
Outfit only: Keep the original person's identity and specify only the clothes to replace. Do not leave old face-replacement instructions in the prompt.
7. Run the inexpensive test first
Select 480p in standard Genjutsu and read the displayed cost before submitting. The current Lite workflow has different resolution choices, so do not accidentally select Lite while following a 480p test plan.
Play the result once at normal speed, then pause at the beats you wrote down. Check the opening, every head turn, the closest face, occlusion moments and the final frame. Look for changes in the two front teeth, moustache curl, hair tuft, nose and ear. Then inspect hands, clothing and background edges.
Fix the biggest problem first. If the side face drifts, improve the side reference or rewrite the turn instruction. If the outfit changes, tighten the clothing instruction. Change one variable at a time so you know what helped.
Once the test is acceptable, check the 1080p quote and run the same working setup at higher resolution. Review it again. A better-looking 480p test is a good decision point, not a guarantee that the next render will be identical.
8. Troubleshoot the right problem
The character changes during a turn: Check whether the references show that angle. Remove inconsistent reference images. Make the turn instruction specific and simplify unrelated edits.
The moustache or teeth flicker: Inspect close-ups, not only playback. Try a clearer face reference and a source with less motion blur. Do not add a long list of contradictory facial descriptions.
The jacket changes unexpectedly: Decide whether you want source clothing or reference clothing. State one choice consistently in the opening and ending instructions.
Hands merge with the face: Note the exact occlusion time. Request natural depth as the hand crosses, but accept that a cleaner source section may work better than repeated revisions.
The upload fails: Confirm the file opens locally, is within the current duration limit and uses a compatible format. Re-export the working copy if needed. Keep the original safe.
A job appears stuck: Check its existing status before submitting again. A duplicate can create another charge. Save the job identifier and error message if support is needed.
The service refuses the request: Read the stated reason and correct a genuinely unsupported or disallowed input. Do not switch to MCP, conceal terms or resubmit through another route to get around the refusal. Technical upload problems and content refusals are different issues.
9. Use Claude with Higgsfield if you prefer
Give Claude the source, original reference and this guide. Ask it to inspect the action, identify which person changes and prepare a short prompt. Have it show the selected model, resolution, duration and quoted cost before any generation.
A useful instruction is: “Prepare this character edit with standard Genjutsu Objects swap. Use the original reference, identify the difficult turns and start with one 480p test. Show the credit quote and wait for approval before submitting. Afterward, show key frames and explain any identity or clothing drift. Do not run 1080p or retry without approval.”
Claude can help organize the iterations and inspect frames. You still decide whether the face looks right. Website Unlimited benefits, where included in a plan, do not mean MCP calls are free; current Higgsfield guidance says off-website generations consume credits.
10. Keep colour consistent
Compare the generated clip to the clean exported source, not an HDR phone playback with a different display treatment. Check skin tone, the mustard jacket and neutral backgrounds. If the source already looks wrong, correct the source export before spending on another generation.
Apply a consistent grade to the before and after footage when building a comparison. Avoid aggressive sharpening while diagnosing identity: it can make edges look stronger without fixing the wrong face. Preserve a neutral version so later colour changes remain reversible.
11. Finish and upscale only when useful
A clean 1080p result may be enough for a Reel. Upscaling is an optional finishing step, not a repair for drifting identity, broken fingers or a changing moustache. Fix those problems before increasing resolution.
If you use an upscaler, read its current output choices and quote. Inspect the teeth, facial hair and skin afterward because enhancement can alter fine detail. Keep the un-upscaled render for comparison.
Frame interpolation is also optional. A 60fps export does not automatically mean better motion; invented intermediate frames can smear a fast hand or a whip pan. Use the frame rate that looks best after inspection rather than forcing every clip to 60fps. Complete character and audio changes before the final enhancement/export pass, then check the final file on a phone.
12. Build the before and after Reel
Place the source and edited version on separate tracks. Match their framing and compare an obvious action, such as a head turn or hand movement. Check alignment at both the start and end. Do not assume identical duration or frame-for-frame sync.
If timing differs, conform the clips in your editor and recheck the mouth and gestures. Use one authorized audio track where appropriate rather than letting two tracks play over each other. Avoid stretching speech just to force a visual match.
A simple reveal can show the source briefly, cut on a clear movement and continue with the character. A split-screen can work when both faces remain large enough to read. Keep captions away from the moustache and mouth so the transformation remains visible. Use the platform's AI disclosure tools where required.
13. Plan the cost before you start
There is no fixed total that applies to every clip. The selected model, duration, quality, route and number of attempts affect the bill. Use the current quote shown for your actual source instead of borrowing another creator's total.
Write down these four amounts before approving a session:
| Stage | What to record |
|---|---|
| 480p test | Quote for one test at your clip length |
| Revision allowance | Maximum number or total cost of additional tests |
| 1080p finish | Fresh quote for the chosen working setup |
| Optional finishing | Separate upscale, interpolation or audio quote |
Your planned ceiling is the test budget plus the high-resolution run and optional finishing. Leave room for a revision, but do not treat unused allowance as a reason to generate more. Record actual completed charges and pending jobs separately. If the test does not establish the character, stop and improve the inputs before committing the high-resolution budget.
14. Final checklist
• Source clip is authorized, clear and within the selected model's current limits.
• Aspect ratio is preserved; colour looks correct in the exported working file.
• Original video and audio are safely retained.
• References are the same character, with the angles needed by the source.
• Target person, face-only versus full-character change and outfit choice are clear.
• Time ranges match actual actions rather than the example in this guide.
• Mode, resolution and credit cost are checked before submitting.
• One 480p test is reviewed at key frames; changes are made deliberately.
• 1080p output is checked again for face, teeth, moustache, hands and clothing.
• Optional enhancement is inspected rather than assumed to improve everything.
• Before and after timing, audio sync, captions and phone playback are checked.
• Final reference, prompt, output and spending notes are saved for the next video.
Current setup reference: Higgsfield Genjutsu help. Model choices and limits checked 29 October 2026; use the options and quote displayed when you run your clip.
Keep the whole workflow beside you.
Download the complete visual guide or upload it to Claude with your footage and character reference.
Download the 10-page PDF ↓